
How to Break Down a Whole Chicken: Easy Step-by-Step Guide
Learning how to break down a whole chicken is easier than you think, and a great way to utilize a cheaper meat option at the store! If you’ve ever looked for the cheapest per-pound price for chicken at the grocery store, you’ve probably landed on the whole chickens. If you’ve landed on the whole chickens and thought “what the heck do I do with this?!” then this post is for you!
What You’ll Need to Break Down a Whole Chicken
You don’t need fancy knife skills or knife set, you just need these few tools you already have in your kitchen and these simple steps to learn this new skill.
- A whole chicken
- A sharp knife of your choosing (like a chef’s knife or boning knife)
- (optional) Kitchen shears
Some people really like a larger chef’s knife, but I like a slightly smaller knife that fits more tightly in my hand to feel exactly where the blade is moving through the chicken.
- A large cutting board (many prefer to use a plastic cutting board when working with raw meat, but I do use a wood cutting board that I clean thoroughly after each use.)
- Paper towels to pat your chicken dry before you start (to help with handling)
- Another cutting board or tray to put your pieces on before cooking or storing
How to Break Down a Whole Chicken: Step-by-Step
Step 1: How to Remove the Chicken Quarters

Begin by laying the whole bird on your cutting board breast side up facing the legs toward you.
Pull the leg away from the body of the chicken.
Slide your knife over the skin between the body of the chicken and the chicken thigh. This small cut will open the cavity between the thigh and the body of the chicken.
Continue down, cutting the skin on the top and bottom of the cavity, until the thigh and body of the bird are mostly separated.

Using your fingers behind the thigh, push upward and away from the body cavity. This will expose the ball joint at the hip socket.
Next, use your knife to cut directly between the ball joint (in the thigh) from the socket of the joint (in the body. Continue cutting through until the leg quarters are fully separated from the body of the bird.
Repeat this process on the second side

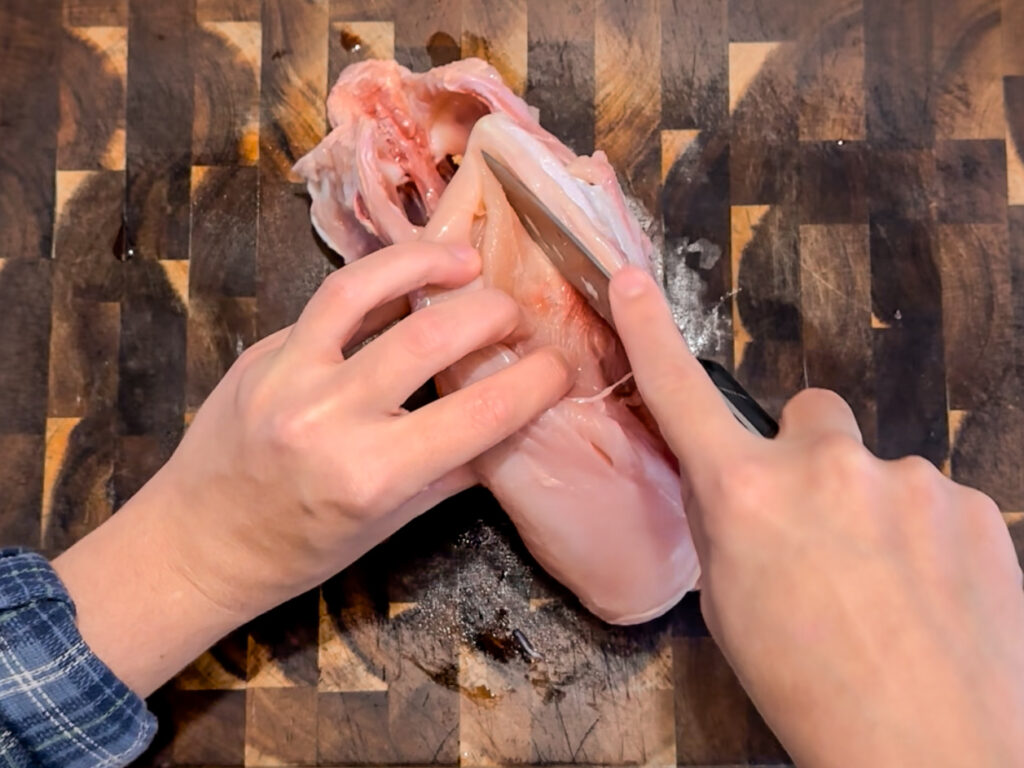
Step 2: How to Remove the Chicken Wings

Flip the chicken so that the back is facing up, and the neck is facing toward you.
Gently lift the wing as in the photo above to find the small space between the shoulder joint and the body of the bird: this is where you will make your cut.

Insert your knife between this line and make clean cuts until you expose the joint.

Insert your knife between the joint and press down to separate them. Keep in mind that at the angle above, the knife will begin to cut through the breast below the wing.
After you separate the joint, turn the knife outward, lift the wing over your knife, and cut outward and away from the bird. This is the best way to separate the wing from the body of the bird, without taking breast meat with the wing.
Repeat this process on the other side for the second wing.

Step 3: How to Remove the Chicken Breasts

Once again, flip over your chicken to lay it on your cutting board breast-side up. At the center of the breast is the breast bone which will be your guide between the breast halves.
Run your finger along the breast bone towards the fatter side (the top). Where the breast bone curves around the top of the chicken breast is where the wishbone is. This will also guide your knife on both sides.
Slowly and carefully run your knife along the side of the breast bone as close as possible to remove as much meat as you can in one piece.
Continue making passes along the breast bone from top to bottom until you reach the body cavity and ribs of the bird, pulling the breast meat away as you do so.
Follow the breast bone up and around the wish bone to free the whole breast in one piece.
Repeat on the other side for two boneless chicken breasts.

Step 4: How to Separate the Chicken Wing Sections
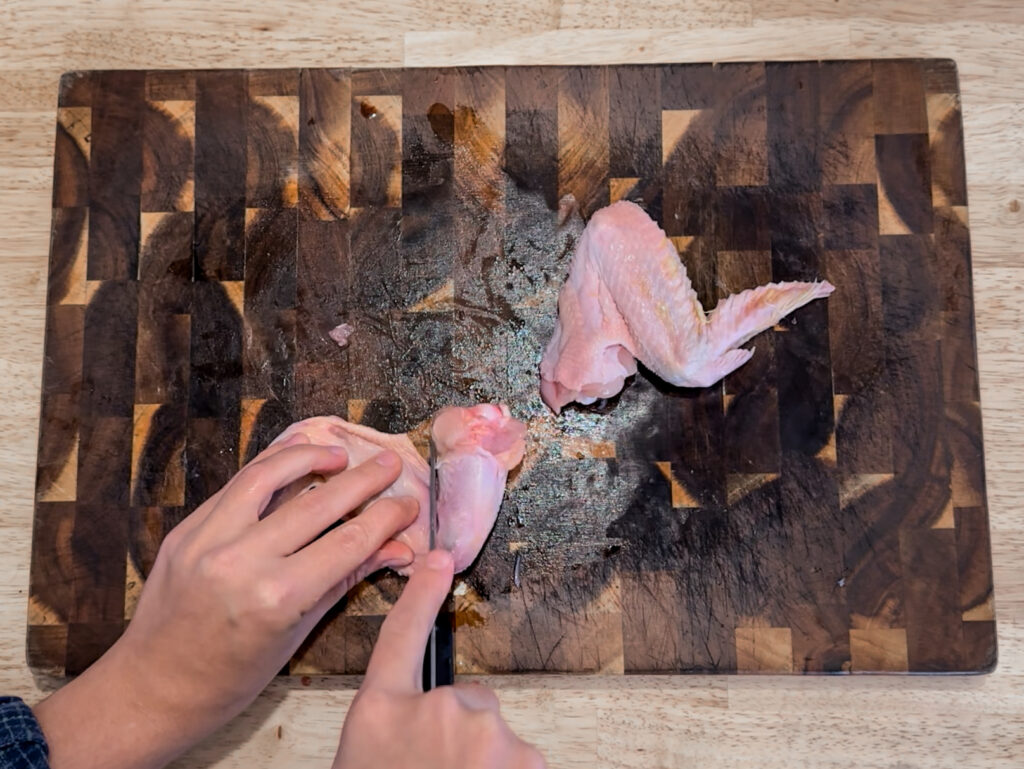
Slide your knife between the joint of the “drumette” and “wingette” (flat). Separate the two sections into separate pieces.

Now find the joint between the wing tips and the “drumette” (flat). This joint can be a little more difficult to get the knife edge between, so as long as I’m using a sharp knife, I’m usually able to just press through the bone.
Repeat these steps for the other wing.
Step 5: How to Separate the Chicken Leg from the Thigh

When you look at the back side of your chicken quarter (the leg and thigh section), you can see a yellow fat line, almost like a seam, between the two cuts of meat.
Following that line with your knife will lead you to the joint between the leg and the thigh, making it easy to separate.

Cut along the line of fat between the leg and thigh until the joint is exposed. You can bend the leg and thigh at the joint if the joint isn’t separated enough to fit your knife between.
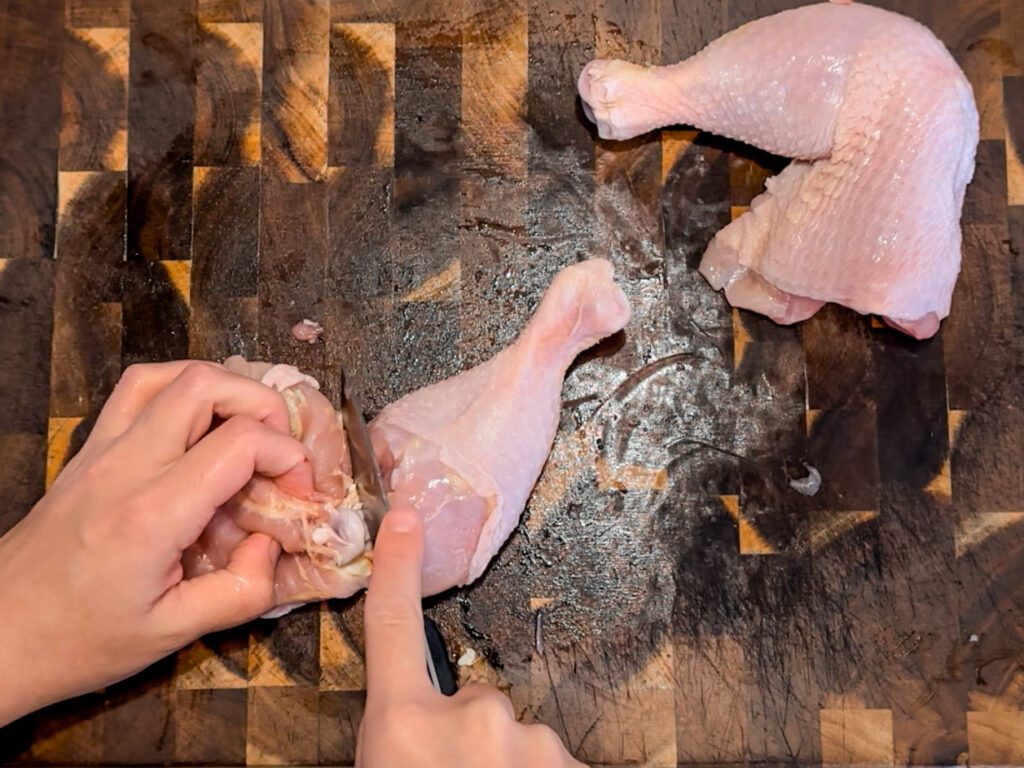
Don’t be afraid to turn the piece of chicken around to get a better angle if needed! Make your knife and the angles work for you, while keeping your fingers safe from the knife.
Sometimes I need to try a few angles to find a good grip and angle.
Repeat these steps for the other chicken quarter.
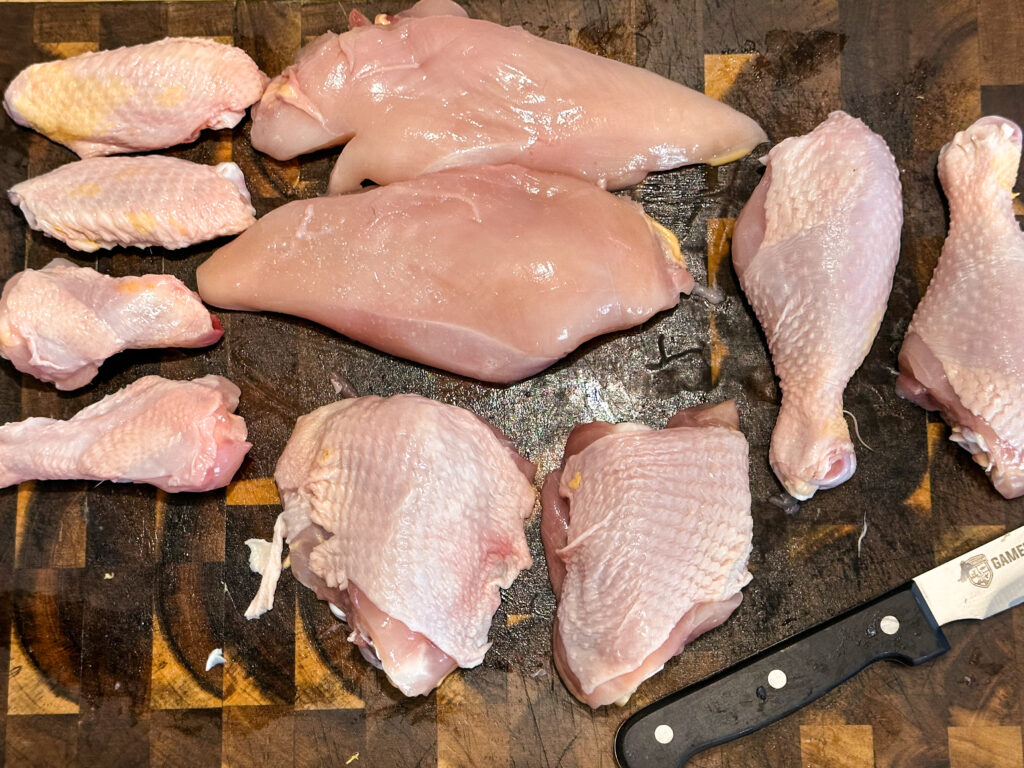
That’s it! Congratulations!
You’ve just gained a wonderful skill to help save money and open up even more options for ingredients in your home kitchen!
Why You Should Learn How to Break Down a Whole Chicken

Buying a Whole Chicken is Cheaper
One of the number one reasons I like to cook with whole chickens is the savings it yields. The savings really add up when it comes to meat!
At my local grocery store, a Perdue whole chicken costs $1.32 per pound. The same brand of boneless, skinless chicken breasts costs $4.64 per pound.
At those prices, that whole chicken is three times the value of the pre-cut selections per pound!
Now, you might argue that in a whole chicken you’re also paying for the weight of the bones.
That is true!
However, I will argue that it’s a worthy investment.
Use the leftover carcass and bones (like the back bone, rib cage, wing tips, and otherwise remaining meat of the chicken) to make homemade bone broth or homemade chicken stock.
If you purchased your bone broth, it would cost $3.17 per quart. That’s $6.34 for the half gallon you could make with the bones you already paid (and saved) for!
Talk about added value.
Wider Variety of Options to Purchase
Purchasing meat is one of the most expensive parts of my grocery list. When I want to make a meal using chicken breast, I have two options.
- I can purchase the more expensive cut of chicken breast, OR
- I can purchase the whole chicken, break the chicken down using these easy steps, save the breasts for later when I want to use them, and save the money per pound!
I had wanted to switch to local meat that was raised using organic, pastured practices, but it is more expensive!
Purchasing the whole chicken from a local farmer, made it much more affordable to begin eating this higher quality meat.
Once we made the switch to buying local, it only made sense for us to start raising them ourselves!
If you are interested in raising a year’s worth of meat chickens, you can read about that here!
Using Whole Chickens is More Versatile in the Kitchen
Learning how to break down a whole chicken showed me more recipes than just grilled chicken breast.
The whole chicken alone can be used for roast chicken: one of the easiest, yet most impressive plated dinners!
We make homemade bone broth more regularly now that we always have chicken carcasses and bones. The broth alone opens doors for all kinds of soups and sauces.
It’s like “If You Give a Mouse a Cookie”… If you have a whole chicken and your own chicken stock… you can make my Old Fashioned Chicken Noodle Soup!
If you begin buying whole chickens regularly and breaking them down, you can even save up the wings until you have enough for a homestead wing night!
Using the entire chicken opens the door to delicious recipes at a fraction of the cost.


How to Break Down a Whole Chicken: A Step-by-Step Guide
Materials
- 1 Whole Chicken
Instructions
Step 1: How to Remove the Chicken Quarters
- Begin by pulling the leg away from the body of the chicken with the breasts facing up and the legs toward you.
- Slide your knife over the skin between the body of the chicken and the chicken thigh. With a small amount of effort, you will be able to see the cavity between the thigh and the body of the chicken.
- Continue down, cutting the skin on the top and bottom of the cavity, until the thigh and body of the bird are mostly separated.
- Using your fingers behind the thigh, push upward and away from the body cavity. This will expose the joint.
- Next, use your knife to cut directly between the ball of the joint (in the thigh) from the socket of the joint (in the body. Continue cutting through until the leg and thigh are fully separated from the body of the bird.
- Repeat this process on the second side
Step 2: How to Remove the Chicken Wings
- Flip the chicken so that the back is facing up, and the neck is facing toward you.
- Gently lift the wing as in the photo above to find the small space between the shoulder of the wing and the body of the bird: this is where you will make your cut.
- Place your knife between this line and cut until you expose the joint.
- Insert your knife between the joint and press down to separate them. Keep in mind that at the angle above, the knife will begin to cut through the breast below the wing.
- After you separate the joint, turn the knife outward, lift the wing over your knife, and cut outward and away from the bird. This will separate the wing from the body of the bird without taking breast meat with the wing.
- Repeat this process on the other side.
Step 3: How to Remove the Chicken Breasts
- Once again, flip over your chicken so it is breast-side up. At the center of the chicken breasts is the breast bone which will be your guide for removing this cut of meat.
- Run your finger along the breast bone towards the fatter side. Where the breast bone curves around the top of the chicken breast is where the wishbone is. This will also guide your knife on both sides.
- Slowly and carefully run your knife along the side of the breast bone as close as possible to remove as much meat as you can in one piece.
- Continue making passes along the breast bone from top to bottom until you reach the body cavity and ribs of the bird, pulling the breast meat away as you do so.
- Follow the breast bone up and around the wish bone to free the chicken breast in one piece.
- Repeat on the other side.
Step 4: How to Separate the Chicken Wing Sections
- Slide your knife between the joint of the "drumette" and "wingette" (flat). Separate the two sections.
- Now find the joint between the wing tip and the "drumette" (flat). This joint can be a little more difficult to get the knife edge between, so as long as I'm using a sharp knife, I'm usually able to just press through the bone.
- Repeat these steps for the other wing.
Step 5: How to Separate the Chicken Leg from the Thigh
- When you look at the back side of your chicken quarter (the leg and thigh section), you can see a yellow fat line, almost like a seam, between the two cuts of meat.
- Following that line with your knife will lead you to the joint between the leg and the thigh, making it easy to separate.
- Cut along the line of fat between the leg and thigh until the joint is exposed. You can bend the leg and thigh at the joint if the joint isn't separated enough to fit your knife between.
- Don't be afraid to turn the piece of chicken around to get a better angle if needed! Make your knife and the angles work for you, while keeping your fingers safe from the knife.
- Sometimes I need to try a few angles to find a good grip and angle.
- Repeat these steps for the other chicken quarter.
Notes
- Don't be afraid to try out a few different knives. Some like a larger knife they can put their weight behind. I prefer a smaller knife that I can feel the cut of. Find what works for you!
- If using right away (or within a few months) store in ziplock bags in the freezer
- If storing longer term, vacuum sealing preserves the best quality of the meat


